
How to set up Meta Ray-Ban Glasses with maximum privacy…
🕹️Gadgets,⭐️Featured
I’m not a fan of Facebook/Meta but I’ve been using their smart glasses 😎 for a while now. Recently there was much controversy around their AI features, as apparently sub-contractors from Kenya were reviewing private footage of people, recorded with these glasses. In this post I’ll explain why I like still like my smart glasses, how I use them and why I’ve turned off all the AI features to hopefully make sure my photos or videos are NOT reviewed by some strangers sub-contracted by Meta.

- What I love about Meta Ray-Ban Smart Glasses
- Generation 2 is much better?
- No AI? Here’s how to set them up!
- Meta AI app settings - making sure it’s not creepy
- Examples of photos I take with these glasses
- Tricks and Tips with Meta Ray-Ban Glasses
- Overall, despite being a Meta product, I love these glasses!
What I love about Meta Ray-Ban Smart Glasses
I initially bought the first generation of these glasses in October of 2024 - I bought the Wayfarer model, size 53 with transition lenses.
Here’s what I love about these glasses:
1. Transition lenses - indoor and outdoor!
These lenses cost extra but they are worth it. This makes them great sunglasses and just regular indoor glasses. While I don’t need correction glasses, I can just keep wearing them when I’m entering a house or when the weather is cloudy.

They are completely transparent and quickly can turn almost totally dark in full sunlight as you can see on the first photo in this post. This transition from dark to full transparency happens very quickly. When I drive a car in full sunlight and enter a dark garage, I don’t have to fiddle with my glasses. I can see where I’m driving with near-seamless adjustment.
2. Integrated speakers for podcast listening
I like to listen to podcasts and audiobooks and with these glasses I can tap to listen to things when I walk or drive the car (or cycle!). No headphones necessary.
3. Good microphones for hands-free talking
When people call me or I call them, the phone can stay in my pocket. I just talk to myself by speaking to the microphones integrated in these glasses. These microphones also tune out other noises around me so people on the other side don’t know I’m talking to them through glasses.
4. Photo camera for impromptu picture taking
When I see something and don’t want to pull out my iPhone Air I just take the picture with these glasses. It’s so quick to just snap it and people around me don’t even notice that. This way I’m not making anyone awkward by pulling out my iPhone and making a gesture of taking a picture.
And no, I’m not posting these pictures on social media and I’m not taking any creepy photos. Just quick snaps I want to get back to.
5. Video camera for first-person perspective
Especially when I drive a car or ride a bike and I want to record what I’m seeing, having a video camera mounted to your head is very convenient. The portrait mode is not my favorite aspect ratio, but hey, better this than nothing!
Also, my friend Thomas from Nadgryzieni podcast suggested I record a video when unboxing a new gadget I buy. It’s a cool way to celebrate it and something to keep in case of any warranty problems.
6. Meta AI? Well, I don’t think so…
I tried Meta AI and it was interesting to be able to take a picture and ask AI to describe what I’m seeing or translate what I’m trying to read. But I can do it on my iPhone, too. To me the privacy is more important and having AI enabled I’m not sure which footage people sub-contracted by Meta are reviewing. Only AI footage or all the photos and videos I’m taking? I don’t trust Meta so I disabled this.
Generation 2 is much better?
After a year of usage, my first-generation glasses broke. Actually the glue that holds the nostrils gave away and my year-old glasses looked like this:
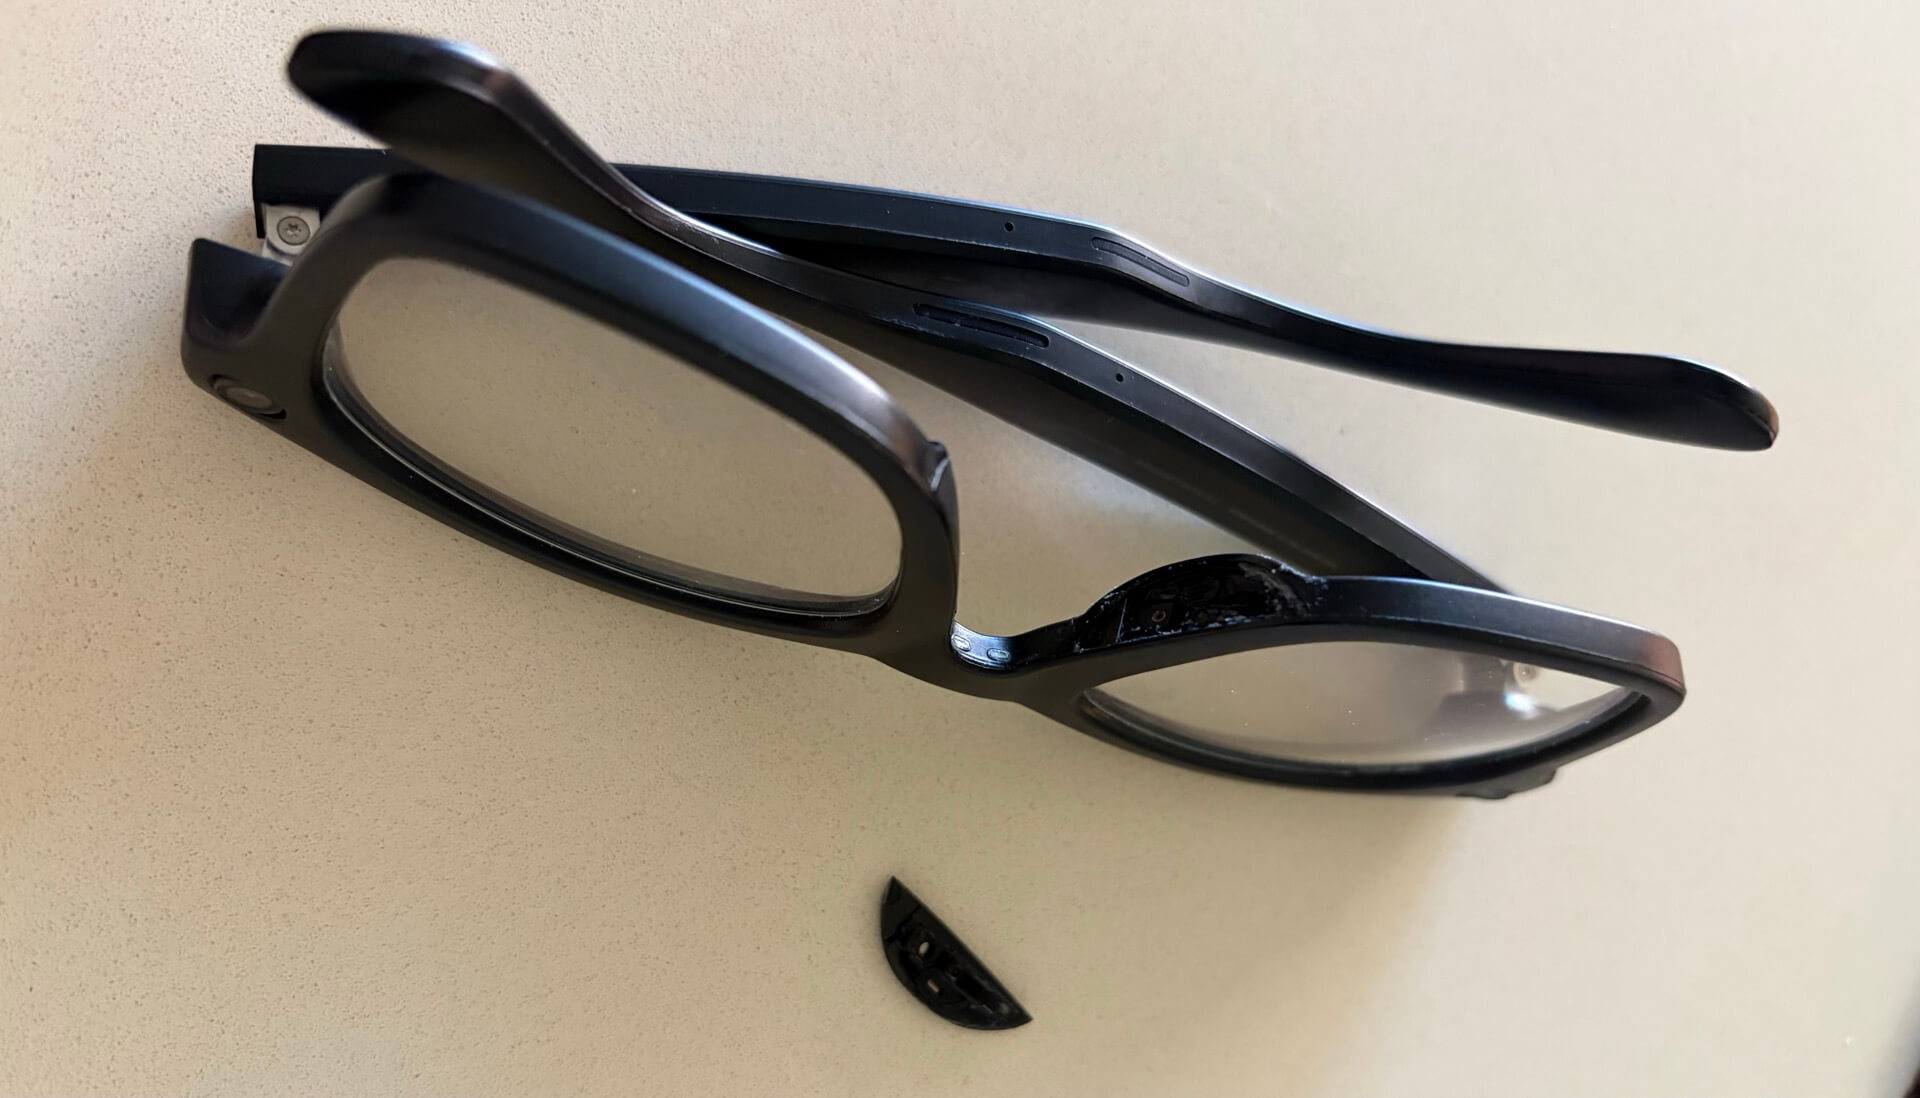
When I contacted Ray Ban, they accepted the warranty claim but they didn’t have gen 1 transition glasses anymore so they wanted to offer me different ones. After lots of back-and-forth they finally gave in and sent me gen 2 glasses instead. I even offered to pay the price difference but they graciously sent me the new ones for free. 🙏
The cameras are a little better and the quality of photos and videos is better, but what’s more important is that the battery life almost doubled. This is a big deal as I tend to wear them for an entire day and now they last as much.
So to me, the gen 2 glasses are a substantial upgrade.
No AI? Here’s how to set them up!
When I got the new gen 2 glasses the whole scandal with Meta sub-contractors was all over the news so I decided to set them up from new without any AI and with maximum privacy in mind. Here are the steps I followed.
Of course, feel free to decide differently than me:
- Download Meta AI app.
- I went to Settings and removed “background app refresh” for this app so that it doesn’t work in the background doing creepy stuff.
- I opened the app again and tapped to set up glasses.
- I refused to accept notifications from this app when they asked for them.
- I did put my home WiFi information to be able to upload photos faster.
- I then went through the entire setup experience.
- When asked about Meta AI - I chose to SKIP.
- When asked for location - I chose NO. The drawback is that photos taken by the glasses have no location attached to them automatically.
- It prompted me to reconsider that as Meta AI needs my location data to function correctly. I ignored it. Sorry Mark, but no.
- When asked to share data with Meta - I chose NO.
- When asked again if I want to enable AI - I said NO.
- When asked to update firmware for my glasses, I did say yes to get them up to date.
Meta AI app settings - making sure it’s not creepy
After the initial setup procedure I re-opened the app and its settings to make sure all is good:
- “Meta AI” in the Meta AI app is disabled
- App connections - none (didn’t connect to WhatsApp which I actually use a lot, I don’t have Instagram or other socials on my phone anyway) - if you don’t enable “Meta AI” you won’t be able to connect to any app.
- Media - auto import from glasses to camera roll - ON.
- Share additional data - OFF.
- Cloud Media - OFF - this way my photos and videos are NOT uploaded to Meta Cloud and will hopefully NOT be analyzed by sub-contractors.
- Find device - OFF (because location is OFF).
- Clicked on Photo Gallery and set access to Photos to LIMITED. Meta doesn’t need access to my Photos to be able to import the photos to it.
- Video settings - I enabled 3K video recording as I want to get the best video resolution possible.
- Audio settings - I used to have “adaptive audio” set to ON, but now I’m testing it with OFF as I don’t like that it listens to the environment and adjusts the audio all the time, I prefer to control it.
All the Photos and videos automatically imported from the glasses to my Photos are put into “Meta AI” album, so it’s easy to track them and later add location manually to them. I have more than 2,000 items there already!
With my wife I’m using a Shared Photos Library and the photos and videos from the glasses don’t automatically go there. I later manually put them there.

Another drawback of this setup is that I cannot use “hey Meta” to ask my glasses to take a picture or video, but then again, it’s not that useful and having the microphones always on listening feels creepy anyway…
Turning it off on cellular
To make sure the “Meta AI app” is not doing any creepy stuff, I went to iPhone Settings and apart from turning off notifications and “background app refresh” I also blocked it from using my cellular connection.
That’s right, you go to “Cellular” and look at the data usage of apps on your mobile connection and find “Meta AI app” and slide the option to disable it.
This way I use this app only at home when I need to update it or update the firmware of the glasses. I don’t use it for anything else.
Automatic import of photos still works! Even when I’m out and about taking pictures with my smart glasses, after a few moments they show up in my camera roll, so this setting doesn’t affect data import between glasses the the camera roll.
Examples of photos I take with these glasses
As mentioned in the 1,5 years of using these glasses I took more than 2,000 photos or videos with them. Just look below as I take these when (1) riding a bike, (2) driving a car or (3) just walking around in a crowded place.

It’s really nice to have these additional cameras always there waiting to be invoked by a push of a button…
Tricks and Tips with Meta Ray-Ban Glasses
Small tricks I got to learn with these glasses:
Take a picture while closing the right eye
When taking a picture, close the right eye and what you see with your left eye is basically the framing you’ll get. It’s because the lens to take pictures is on the left side.
Take a video while closing the left eye
With video do the other way round and close the left eye to get the most accurate frame. Again, it’s because the video camera is on your right, above your right eye.
Switch audio from CarPlay to glasses
When I drive my car, it automatically connects audio to my car speakers through CarPlay. Usually that’s OK, but very often I prefer to just listen to the audio directly through the glasses and there’s a very neat way to switch my audio source:
- When the audio plays in CarPlay, tap on the right side of the glasses to PAUSE it.
- When it’s paused, tap again on the glasses to PLAY and it will play on the glasses now.
It’s very handy as I can drive the car and don’t have to fiddle with settings to change the audio source.
Overall, despite being a Meta product, I love these glasses!
Use them every day. Don’t love the privacy situation and having to disable features like AI for it, but still find them so useful that they’re my companion every day. 😎