M1 MacBook Air changed my home office setup for 2023 completely!
🏠Office
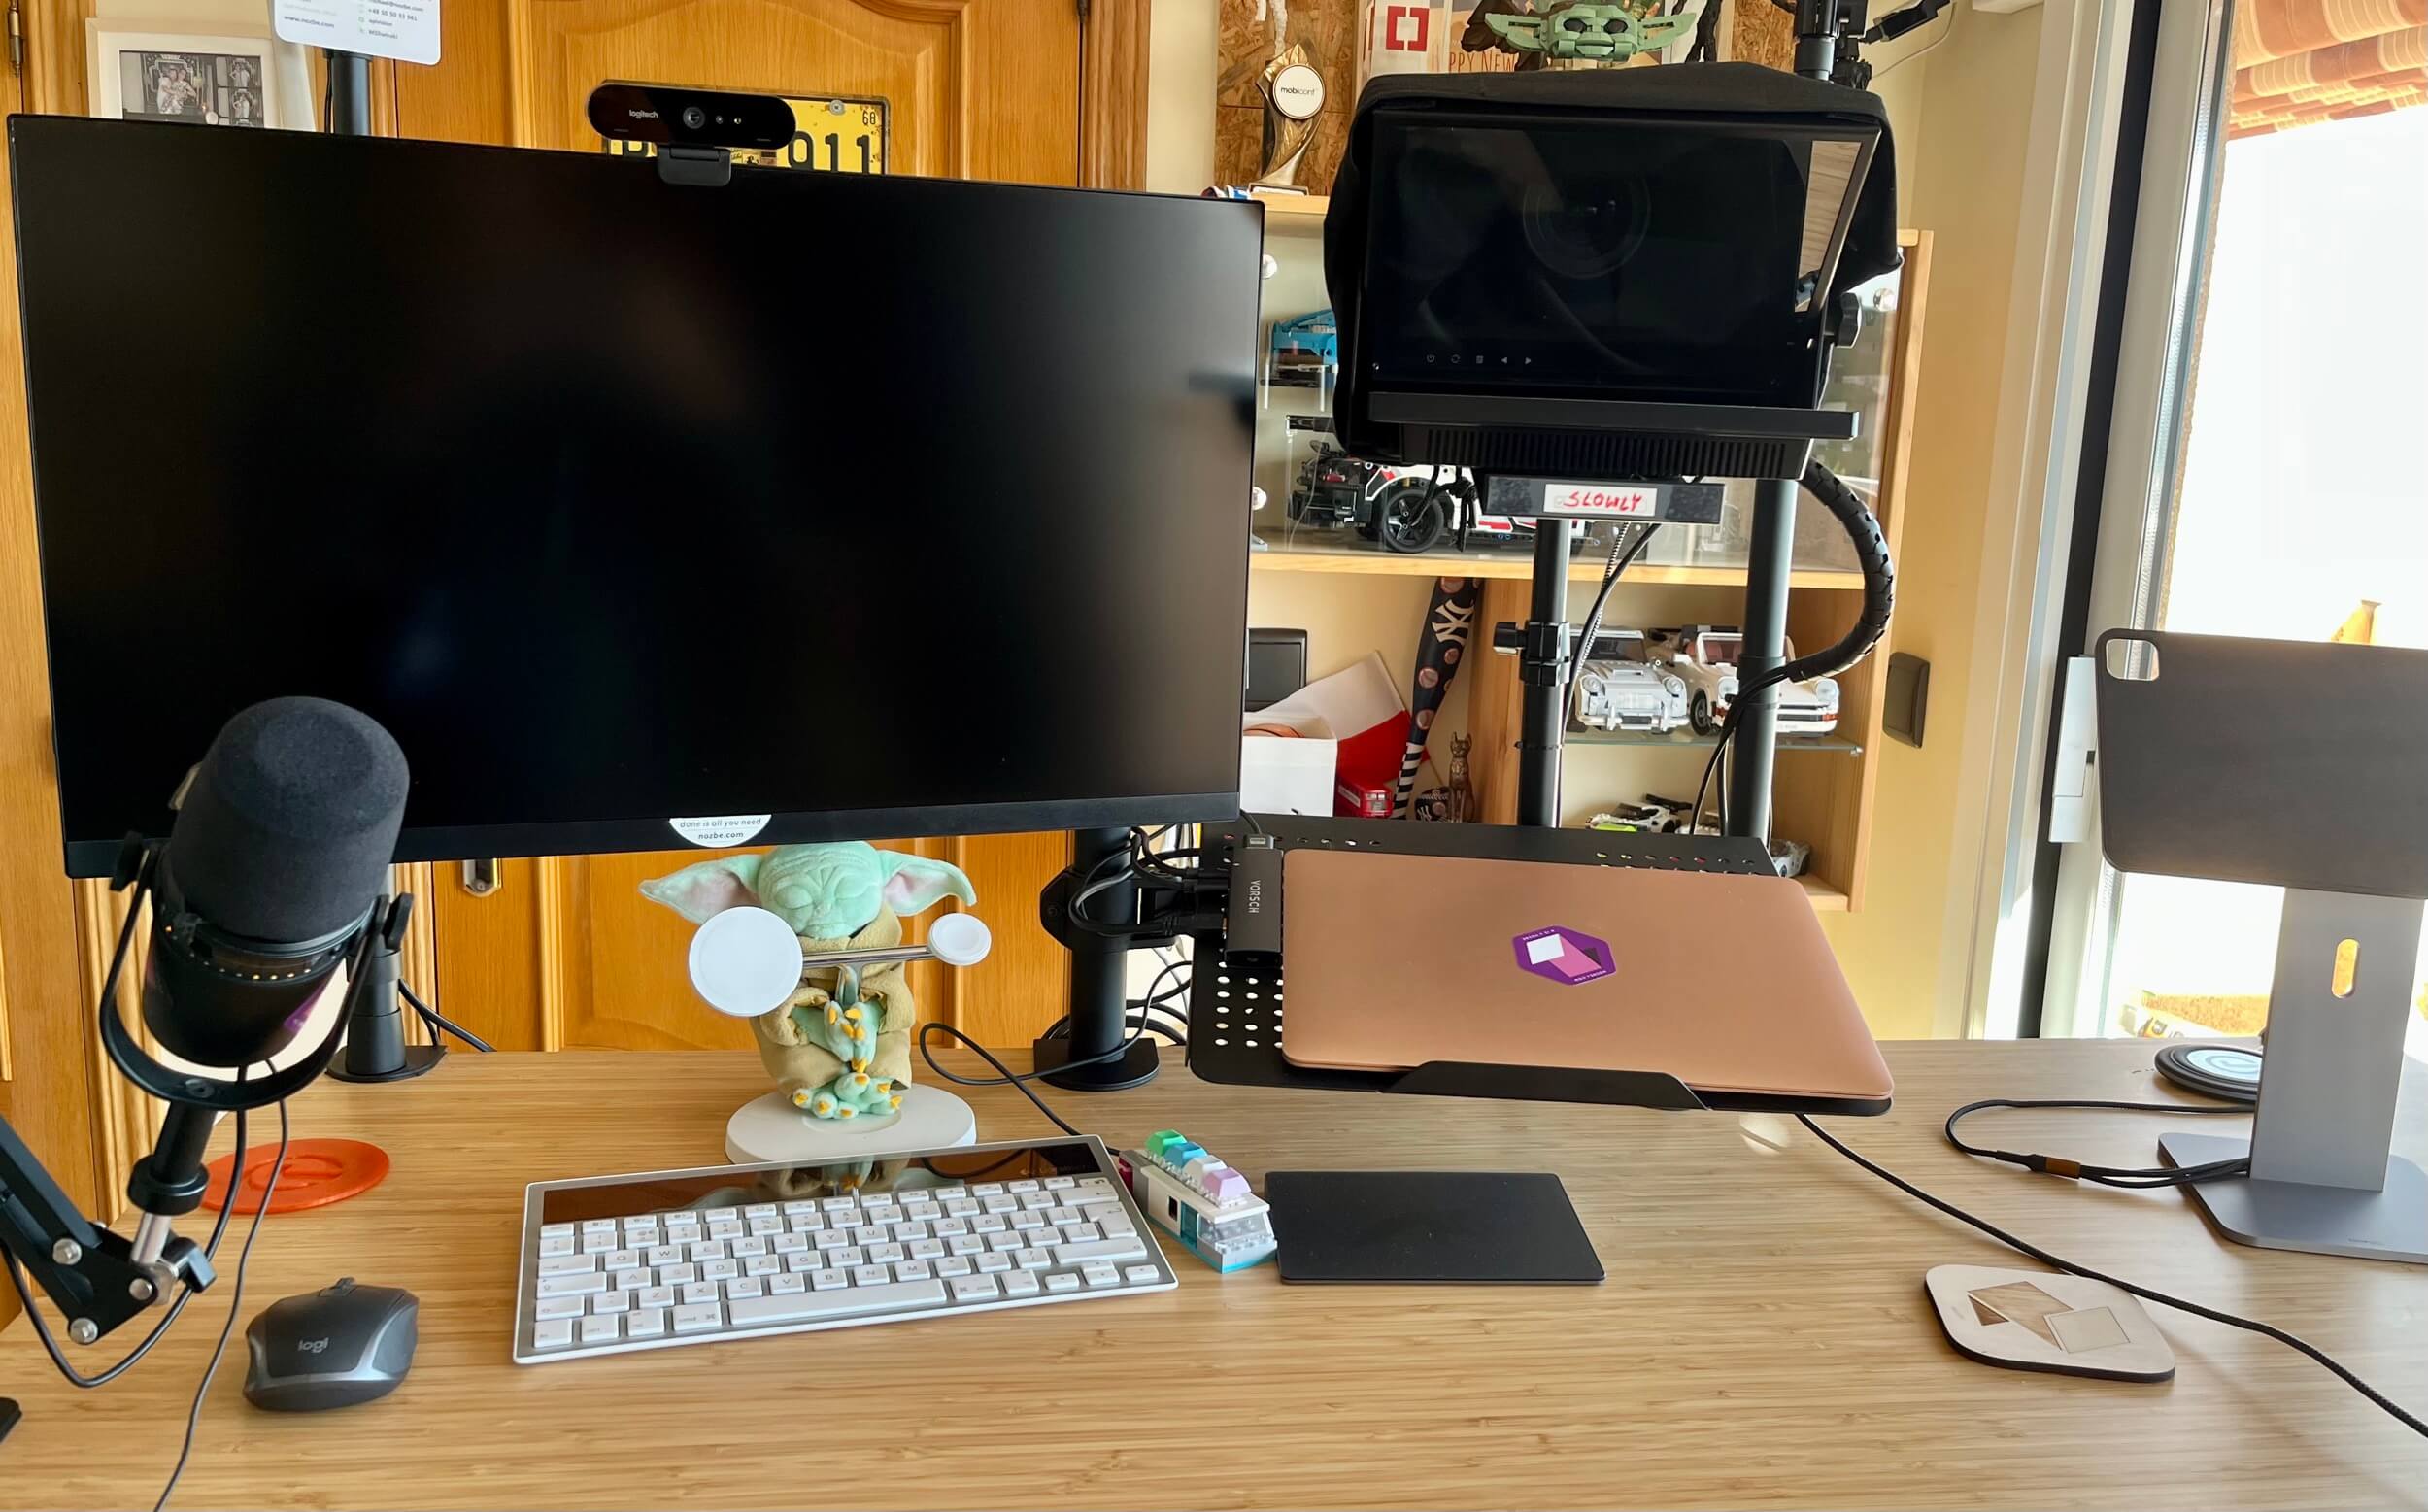
Time for my annual home office update as it’s different from the one set up for 2022 when I configured a streaming kit. I thought that setup was going to stay for years to come. I even recorded a short video and a long video walkthrough about it. Well, this all changed when my iMac 5K became too old to get MacOS updates and I had to swap it for an M1 MacBook Air earlier this year. Going back to the laptop and external screen setup in my home office was something I haven’t done since 2012 with a MacBook Air connected to a Thunderbolt Display. Here’s my new 2023 setup, which I have been testing for the last few months and so far has been working pretty well for me:
- M1 MacBook Air with 16GB RAM and 1TB SSD
- LG 4K 27” external display
- Advantage of the MacBook Air with external display vs the iMac 5K? I can haz one or two screens at a time!
- Challenge 1: How to connect all this to my streaming setup?
- Challenge 2: How to hook up many things to just two MacBook Air ports?
- Solution: two USB-C thunderbolt hubs connected to each other with an HDMI switcher
- The complete setup is neatly installed and works great!
M1 MacBook Air with 16GB RAM and 1TB SSD
I bought this M1 MacBook Air 💻 almost two years ago for our internal Nozbe testing. My The Podcast co-host Radek, our CTO, was using it for almost all of the 2021 and he gave it back to me when he got himself an M1 MacBook Pro.
Even back then when I ordered it, I decided to future-proof this laptop and got the 16GB Ram version with 1TB SSD which is just enough for me. If I need more storage I still have an external 2TB SSD which I used with my iMac 5K. But so far I haven’t needed it.
LG 4K 27” external display
I bought this screen for my wife almost 2 years ago for her home office (she works at home 1-2 days per week). However as she uses a company Windows laptop, I gave her a different screen and took this, as it supports one-cable Thunderbolt Display and USB-C charging with the MacBook Air. The exact model I got is LG 27UK850-W.
It’s a 4K display but I’m using it at the denser setting so that I get the 5K resolution scaled. And frankly, I don’t see the difference between this and the iMac 5K full retina screen. My office is on the top floor of our house with lots of light, so I actually enjoy the matte screen of this LG display.
When the Apple Studio Display launched I was tempted to give it a shot but in the end I stayed with this LG screen.
Advantage of the MacBook Air with external display vs the iMac 5K? I can haz one or two screens at a time!
With my iMac I had a standard stand. It wasn’t very ergonomic and it occupied a bit of important space on my desk. That’s why this time around I decided to really kill these two birds with one stone and got myself a special mount for both the display and the MacBook Air. This way I could use either just one screen or two screens, depending on what I wanted to get done. And they both would be elevated above my desk.
I got myself a special mount for both of them:
- On the left I installed the display using the VESA mount.
- On the right I put an elevated stand for the MacBook Air.
This is the exact mount I got.
After a few months like this I can report that I prefer to use just one big display, just like I did back in the iMac days. I think it’s mostly because my most important display is my iPad Pro 13 anyway and the LG screen attached to the Mac is just an additional big canvas.
However, sometimes I do open up the MacBook Air for additional screen real estate. And I’m happy that the M1 chip makes it so snappy to switch between two screens.
Challenge 1: How to connect all this to my streaming setup?
M1 MacBook Air only supports ONE external display. So when I’m recording an interview using my streaming setup and my small external monitor, I need to switch the displays.
For interviews and No Office podcast recordings I usually unplug the 4K display and hook the small screen that’s below the teleprompter. However I didn’t want to keep plugging and unplugging cables, right? So what to do?
The answer is below.
Challenge 2: How to hook up many things to just two MacBook Air ports?
Yep, the MacBook Air has only two Thunderbolt/USB-C ports. Only two. And I want to be able to connect these things:
- External display with power
- Ethernet cable for stable Internet.
- External Logitech Brio webcam
- HDMI cable to the teleprompter screen
- USB to HDMI connection to the Sony camera through CamLink
- USB connection to an additional external keyboard
So there you go - 6 devices that must be connected to my MacBook Air’s 2 ports. Impossible? Not to me!
Solution: two USB-C thunderbolt hubs connected to each other with an HDMI switcher
Before I start - I’ll explain that I didn’t want to spend lots of money on some fancy huge Thunderbolt hub with million ports. I was seeking a cost-effective solution that would get my job done, ideally without requiring additional power brick.
I also wanted to be able to unplug my MacBook Air easily. Preferably with one swoop. With this out of the way, after lots of trial and error, here’s what I came up with:
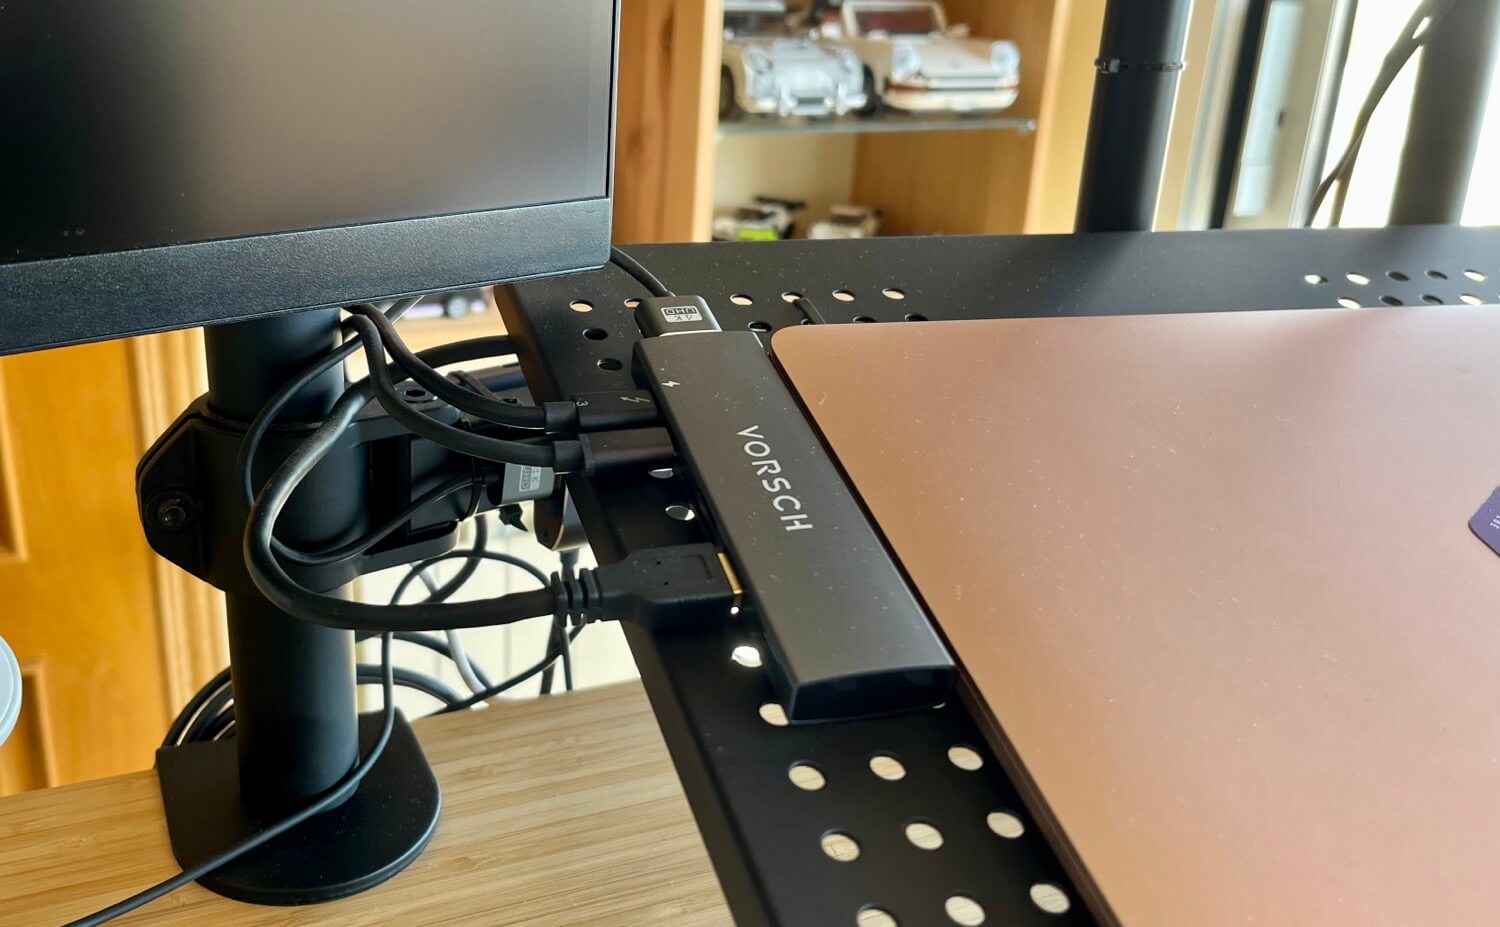
Step 1: Double-port USB-C/Thunderbolt hub
I found this HUB by company called Vorsch which has two Thunderbolt ports that connect straight to both ports of the MacBook Air. It also has two USB-C/Thunderbolt ports on the outside, two USB-A ports and an HDMI port so I connected:
- Thunderbolt cable from the 4K screen to its first Thuderbolt/power-through port - for both screen signal and power delivery.
- Second USB-C hub for more USB devices and LAN (more details below…)
- HDMI cable to the HDMI switcher (more below…)
- CamLink 4K using USB port - this proved to be the most stable way to get the video from my Sony camera to my Mac.
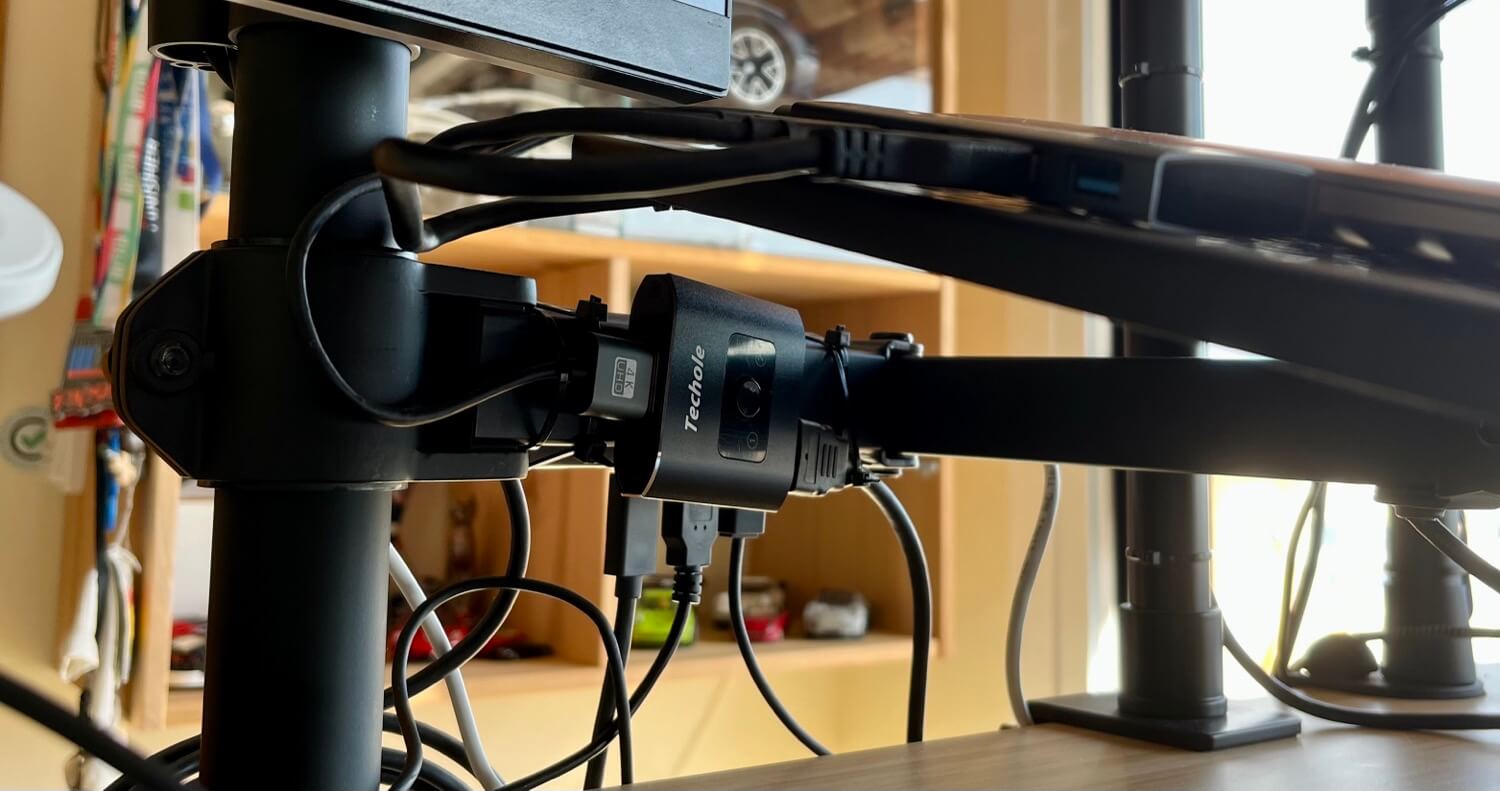
Step 2: HDMI Switcher for the Teleprompter screen
As per my streaming setup I have an external 10” monitor below the teleprompter for the interviews and chats. This way I can look the person in the eyes while giving them a great video of me through the Sony camera through teleprompter.
However, the M1 MacBook Air can only connect to 1 external display. This means that when I have to use the teleprompter and the teleprompter display I cannot use the 4K monitor.
To minimize the number of cables I have to yank out of the MacBook Air hubs I decided to use a simple hdmi switcher. This way the HDMI cable to the external display is permanently connected to my MacBook Air’s hub, but it’s going nowhere. I has no signal because the switcher is set to the position of an empty cable.
Whenever I want to use the display, I just yank out the main Thunderbolt cable that connects me to the 4K display and then push the button in the HDMI switcher and my teleprompter screen becomes my main monitor.
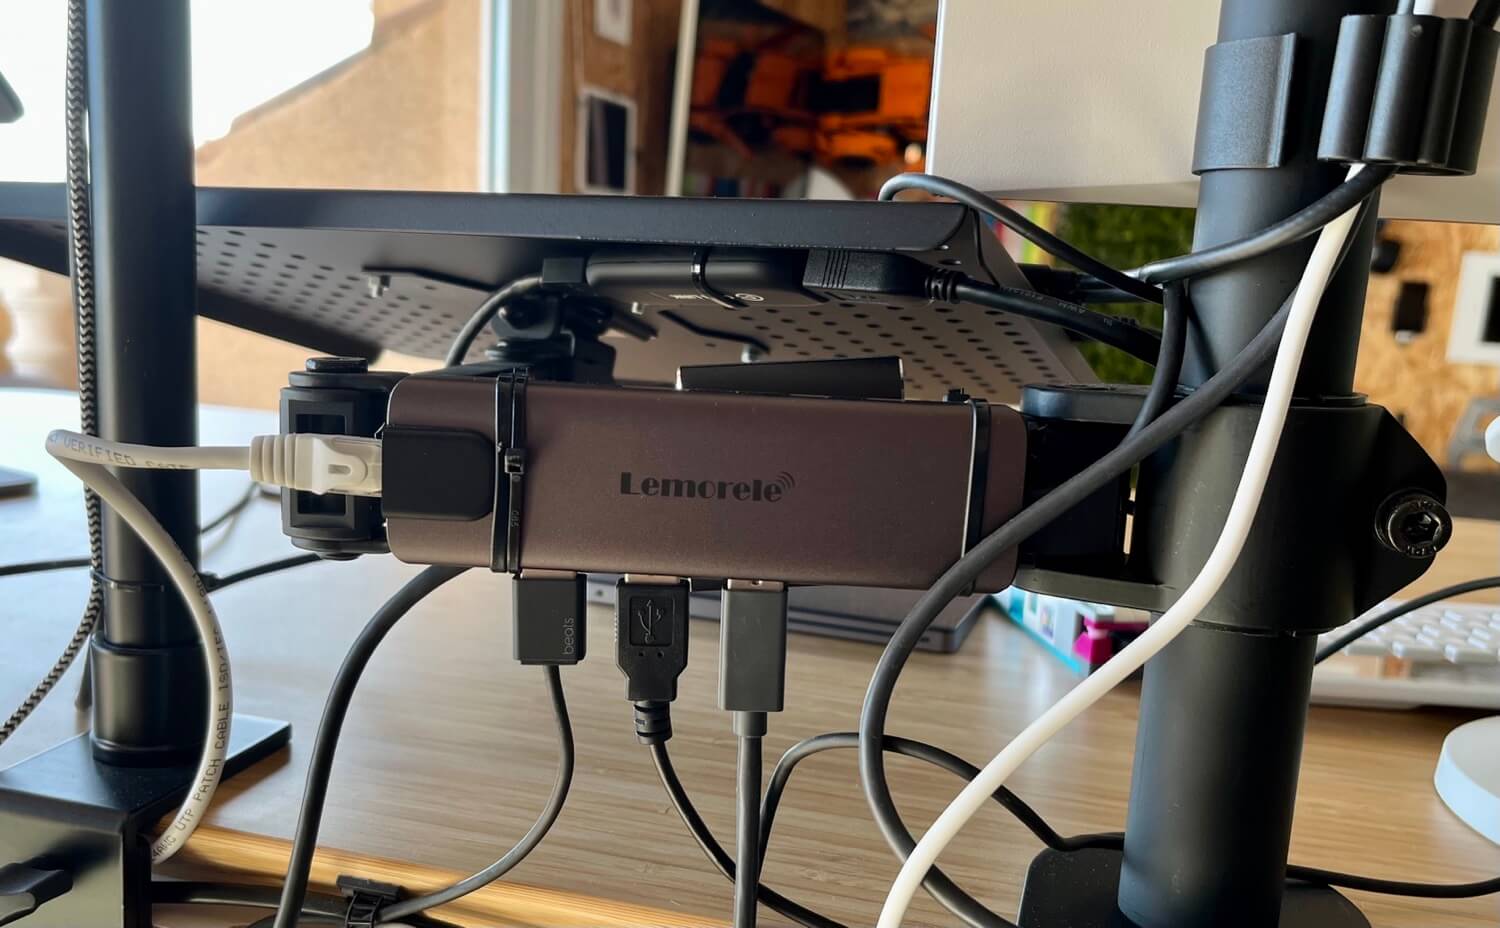
Step 3: Secondary USB Hub with LAN
To connect more things to the MacBook Air, I’m using a secondary USB HUB by a company called Lemorele which as explained above I connected to the main hub. This way I can connect more things to the computer:
- LAN cable for the fastest Internet
- USB cable for external custom keyboard (I’ll blog about it soon enough)
- USB cable to the Logitech Brio webcam
- USB cable to the Shure microphone
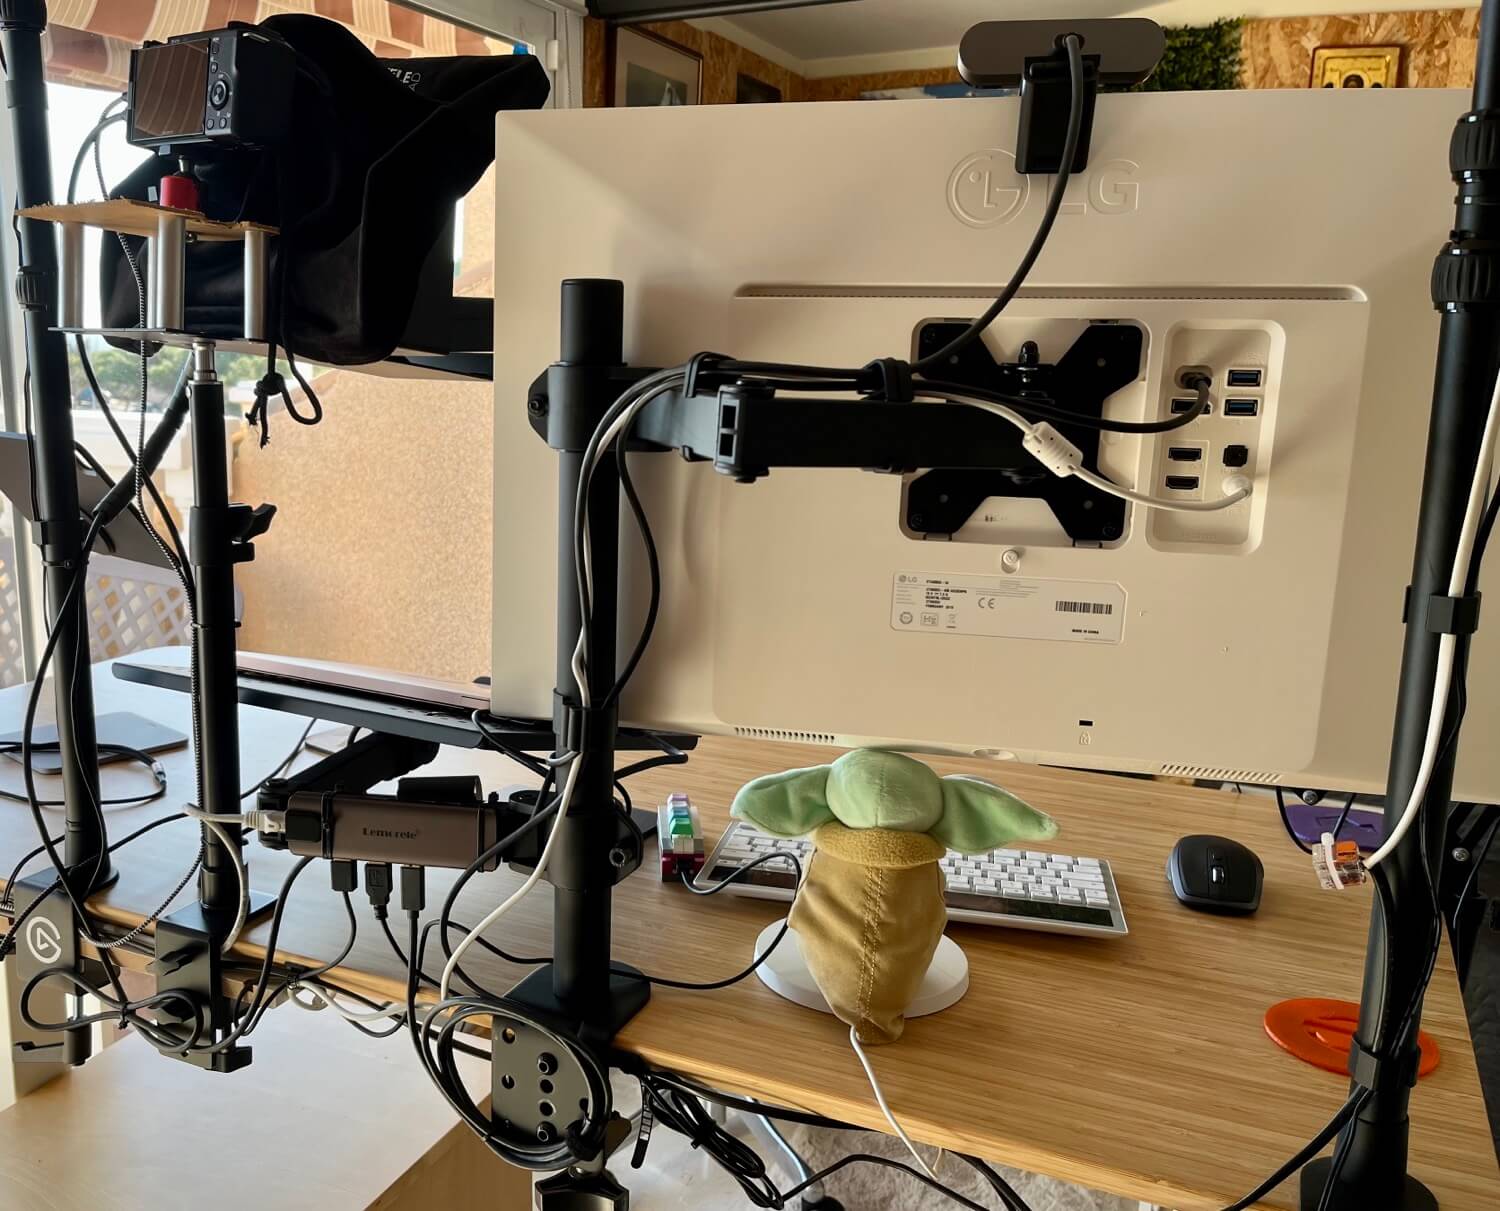
The complete setup is neatly installed and works great!
On my way to this setup I’ve tried several hubs and cable combinations. This one works, because at any point in time I can either just detach the MacBook Air easily, or just the external screen while having all the other peripherals connected. And there’s no image or audio latency from the Sony camera, Shure microphone or Brio webcam. Here’s how it all looks from the back:
After many years of having a desktop computer 🖥️ I’m starting to appreciate the MacBook Air + external screen setup.
Now my home office is big enough that I also have a dedicated iPad Corner for my iPad Only work as an alternative.
This is my dream setup for 2023. Let’s see how or if it evolves next year or will it stay longer like this.